Armcor split heat recovery units
All split units provided by Armcor come with a nitrogen holding charge and do not contain any refrigerant gas. The reason for this is when the pipework is completed the whole unit, condenser, pipework, and indoor unit are tested and vacuumed as a whole. This provides absolute certainty of the integrity of the refrigeration system.
Safety First
Before starting any works please read the Code of Practice for safety guidance.
Australian and New Zealand Refrigerant Handling 2007 part 2.
Available on www.arctick.org
Equipment List:
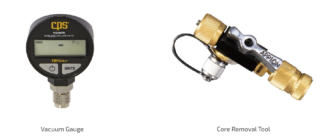
- Vacuum Gauge must be a digital, modern gauge with a 3/8’’ hose connection.
- Vacuum Pump – Two stage commercial vacuum pump.
- Vacuum Hoses – Rated to 30 microns or less. A 10mm or 3/8’’ hose must be used from the unit to the vacuum pump. Min of 230 l/sec pump is required.
- Valve core removers with ball valves – These need to be rated preferably to 30 microns.
- Vacuum Pump Oil fresh oil must be used for the Armcor units. New oil will speed up the vac process. Change the oil while the oil is warm.
- Nitrogen Gauge and bottle
- 1/4 to 5/16’’ fittings.
- Refrigerant Scales
- Digital Manifold Gauge hose set with superheat readings.
- Coil magnet
- Safety PPE
3 Way Valve…… Important Note.
If the unit has a reheat coil, please ensure the reheat valves are opened with a coil magnet before pressure testing and evacuation. This is important as the unit will not pressure test or evacuate correctly if these valves are closed.
Pressure test the system
Once the pipework has been connected the system is ready to be pressure tested. This is an important part of the process to ensure the system is free of leaks.
- Purge the system with dry nitrogen to help remove any excess moisture.
- Pressure test the system to 450PSI or 3000kpa using a quality set of gauges and filling slowly from both the discharge and suction ports. Disconnect the suction gauge after 200PSI to avoid damage.
- Let the system settle, photo the gauges and leave for one hour and recheck.
- Let the system remain under pressure for 24 hours and check again. There maybe some pressure differences due to temperature fluctuations. A 5c temperature drop will reduce the pressure by approx. 10PSI.
Evacuation of the System
Dump the nitrogen and remove the Schrader access valve for the port on the discharge side, then fit the core removing tool. Test the vac gauge first by installing the vac gauge on the pump and starting the pump and it should read 50 microns or less.
Use a 3/8’’ or 1/2’’ hose directly from the core removing tool to the vac pump. The bigger the line the faster the vacuum. Do not vac out through a manifold gauge set.
Install a quality vac gauge on the suction line or discharge line access port. Do not install the Vac gauge on the pump or the discharge line, which could give a false reading.
Deep vacuum method will require you to pull vacuum down to 200 microns or less. On the Armcor units this will require at least an overnight vac. General standard for residential vac is 500 microns and this is not sufficient the Armcor units. Photo the vac gauge reading for your records.
Once you have reached your vacuum isolate vacuum by shutting the handle on your core removing tool and perform a rise test for 30 minutes. A raise in vacuum pressure may not indicate a leak but could be moisture still in the system.
It should not rise more than 100 microns. If it does break the vacuum with nitrogen, then perform evacuation again to ensure the removal off all contaminants. You may need to change oil in the vacuum pump as this will quicken the vac pump time and deepen the vacuum reading.
Isolate the vac pump from the vac gauge and observe the gauge reading. If the system has a leak or contaminants are still present, you will see a quick rise on the micron gauge that will continue to climb.
IMPORTANT NOTE: It is very important to use vacuum rated hoses and core removal tool and quality vac pump and gauges. If the equipment is not suitable you will find the set up will begin to leak mimicking a system leak that is not actually present.
Moisture in the System
If a vacuum cannot be achieved to 200 microns, it is possible you may have moisture in the system especially if the pipework was installed in humid or wet weather conditions.
The triple vacuum method is like the above but can help you achieve a much lower vacuum. You will need to evacuate the system to 500 microns, then break vacuum with dry nitrogen. Dump nitrogen then evacuate down to 500 microns once again, repeat this process one last time after this. The nitrogen helps with dehydrating the system.
If you follow the above, you can be sure your systems will be correctly evacuated and dehydrated ready for charging. Using the correct equipment is critical to achieving the desired vacuum.
Adding Refrigerant Charge
Now that the correct vacuum is achieved, slowly add refrigerant liquid through the core removal tool making sure to bleed any air out of the hoses before introducing refrigerant into the system.
Remove the micron gauge once the system has reached 10PSI so it is not damaged with high pressure.
Charge the system to the base charge recommended by the manufacturer by weight using scales.
Wait for 30 minutes start unit if suitable ambient conditions.
If the ambient temperature is below 7c wait for 4 hours with the sump heaters on before starting the unit.
Charging to correct Superheat
After base charge is installed and unit is started run for 30 minutes and then charge to superheat, adding refrigerant as liquid through the suction port. Charge to 10-12c superheat on cooling and 5c on heating.